To those of you who have been following...I have moved to a new blog site. Please check it out for continued cooking insight...
Http://realmomchef.wordpress.com
You can become an email follower on that site as well and will be notified as soon as I post.
Thank you for your support!
~Liz
Monday, January 21, 2013
Wednesday, January 9, 2013
I've Moved!
From this point forward I will no longer be posting on THIS blog site. To continue to be a follower of my blog, please go to:
I will be working on transferring old content as well as a great lineup of new content to the site so please be sure to "follow" my new blog for email updates of all of the new posts. Thank you fellow foodies!
~Liz
Wednesday, November 28, 2012
Quick Party Food: Edamame Dip
*Today's Technique: Seeding a Cucumber*
It’s the most wonderful time of the year… Scratch that. I think it should read: It’s the most busy time of the year. I have 2 birthdays, an anniversary, plus the usual hustle and bustle of the holidays. I have already conquered one birthday and came out unscathed for the most part. There was one small incident when I was making my daughter’s birthday cake where I knocked over a whole carton of eggs and sent them crashing to the floor. What a mess! I had to sneak into my neighbor’s house-they were in Lego Land-to try to score more eggs and when I realized they had whittled down their food supply and didn’t have any eggs, I had to make an emergency trip to the store. (In case you’re wondering, I fessed up to my neighbors upon their return and still managed to get invited to their house for dinner for some Cincinnati Chili. There’s nothing like good friends!)


Equipment:
Procedure:


It’s the most wonderful time of the year… Scratch that. I think it should read: It’s the most busy time of the year. I have 2 birthdays, an anniversary, plus the usual hustle and bustle of the holidays. I have already conquered one birthday and came out unscathed for the most part. There was one small incident when I was making my daughter’s birthday cake where I knocked over a whole carton of eggs and sent them crashing to the floor. What a mess! I had to sneak into my neighbor’s house-they were in Lego Land-to try to score more eggs and when I realized they had whittled down their food supply and didn’t have any eggs, I had to make an emergency trip to the store. (In case you’re wondering, I fessed up to my neighbors upon their return and still managed to get invited to their house for dinner for some Cincinnati Chili. There’s nothing like good friends!)
Unlike birthdays, anniversaries are much easier. My
husband and I hang out alone and we eat and toast to “us”. We make sure that we
are the ones doing all of the asking and attention begging for what always
seems like a much-needed date night. This year we had the opportunity to eat at
a restaurant in Downtown Richmond, Chez
Foushee, which is owned by the man who catered our wedding. They have
always only been open for lunch, during the week, because they catered in the
evenings but have recently opened for business Thursday through Saturday evenings
and for weekend brunch too. They make the most amazing lemon butter cake which
is truly one of the best desserts that I have ever put in my mouth. That’s
another story though.
Since this time of year is so busy, and so fun, I decided
to devote my recipes for the next month or so to easy and fun party food. I was
inspired by this restaurant I went to a few weeks ago that had a delicious
edamame spread on the menu. My husband, my friend and I had attended a lovely
wine and beer tasting one evening that had a couple hundred selections. Our
friend retired early because he had to be at the hospital the next morning. (ER
doctors are good friends to have. My advice if you have one: Make them a
Godparent to one of your children ;)) Soon after, my husband and I decided that
we had had enough, and the hors d’oeuvres that were served at the tasting were
not going to cut it as dinner. We headed up the street to a new restaurant with
high ceilings, lots of tables and a good old Richmond vibe. We really only
needed a snack and the edamame spread caught my eye. It was served with toast
points, which in my opinion were the wrong pairing, but nonetheless, it was
delicious. When I eat at a restaurant and eat something that I really like, I
often question the server about the ingredients so I can attempt to recreate
something like it at home. This recipe had 3 ingredients: edamame, sesame oil
and wasabi. My version is very simple with the addition of 2 ingredients (plus
salt which should always be assumed). I added a little lemon juice to pop the
flavor. It’s often a good idea to add something acidic to your food because the
acidity acts as a flavor enhancer. I also added hemp seed oil to make it
creamier. I’ve mentioned before that hemp seed oil is wonderful because it’s
loaded with omega 3’s but I understand that you may not have it on hand so
extra-virgin olive oil is a fine substitute. I think of sesame oil as a spice
and a little goes a long way. Just keep that in mind when using it. The spread,
or dip, goes really well with rice crackers, cucumbers, sugar-snap peas, grape
tomatoes, or any other dipping vegetable. I have two non-gluten extended family
members so this is a wonderful appetizer for them as well.
Enjoy and be on the lookout for more simple and delicious
holiday treats!

Edamame Dip
Makes about a cup
*Gluten Free*
*Usually Dairy Free and Vegan but check
packaging*
Ingredients:
1 ½ cups frozen, shelled,
edamame beans
2 teaspoons sesame
seed oil
3 tablespoons hemp
seed oil (or extra-virgin olive oil)
1 tablespoons
lemon juice
1 teaspoon wasabi
paste (or more depending on taste)
¾ teaspoon sea
salt

Measuring spoons/cups
Knife and cutting
board
Lemon juicer
(optional)
Small pot
Strainer
Food processor
Silicone spatula
Procedure:
-Cook edamame beans in plenty of boiling water for 5
minutes. Strain and place in food processor.
-While beans are cooking, add remaining ingredients to food
processor.


-Process all ingredients for 1 minute. Scrape down sides
and bottom and process for 2 minutes more.
-Adjust salt and wasabi to taste.
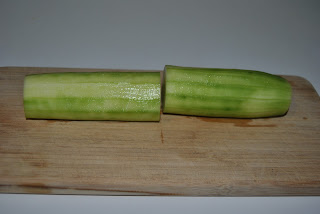
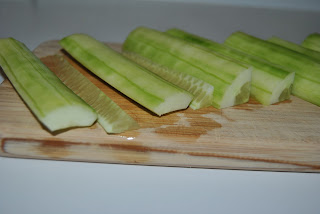
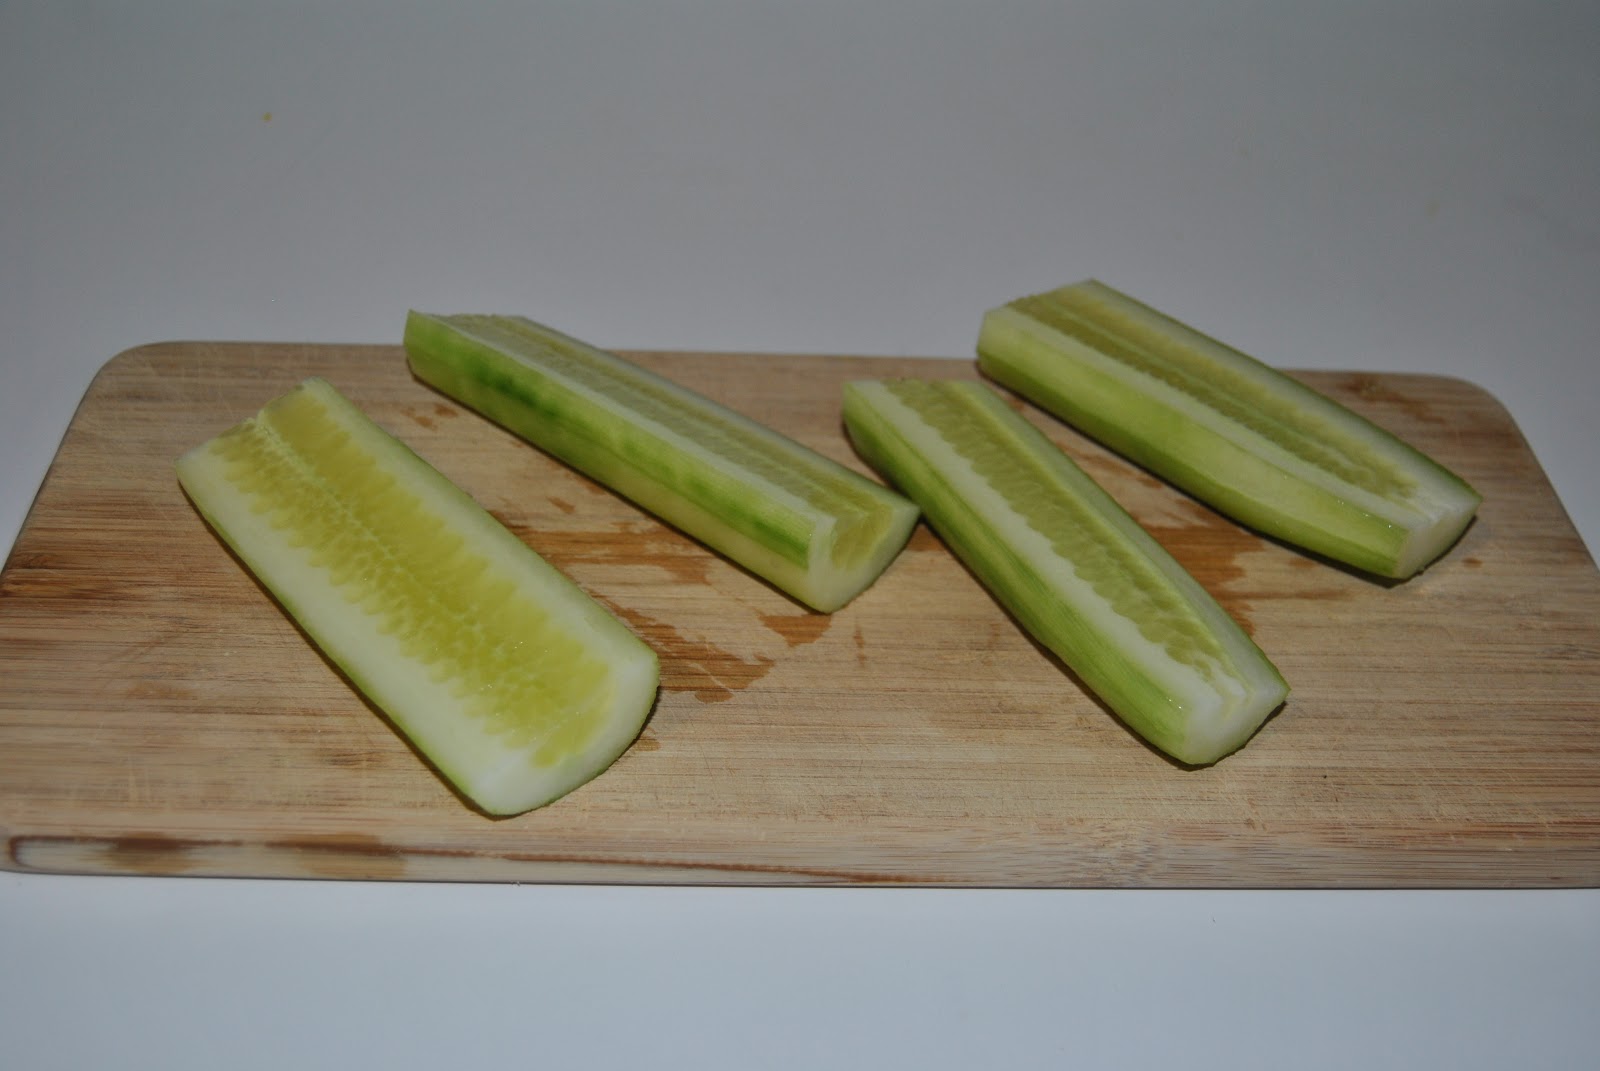
-Serve with rice crackers and/or dipping vegetables. (Technique: See below for a quick way to seed a cucumber.)


-Cut cucumber in half if long.
-Cut each half in half lengthwise.

-Cut in half lengthwise again.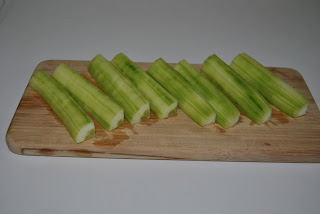


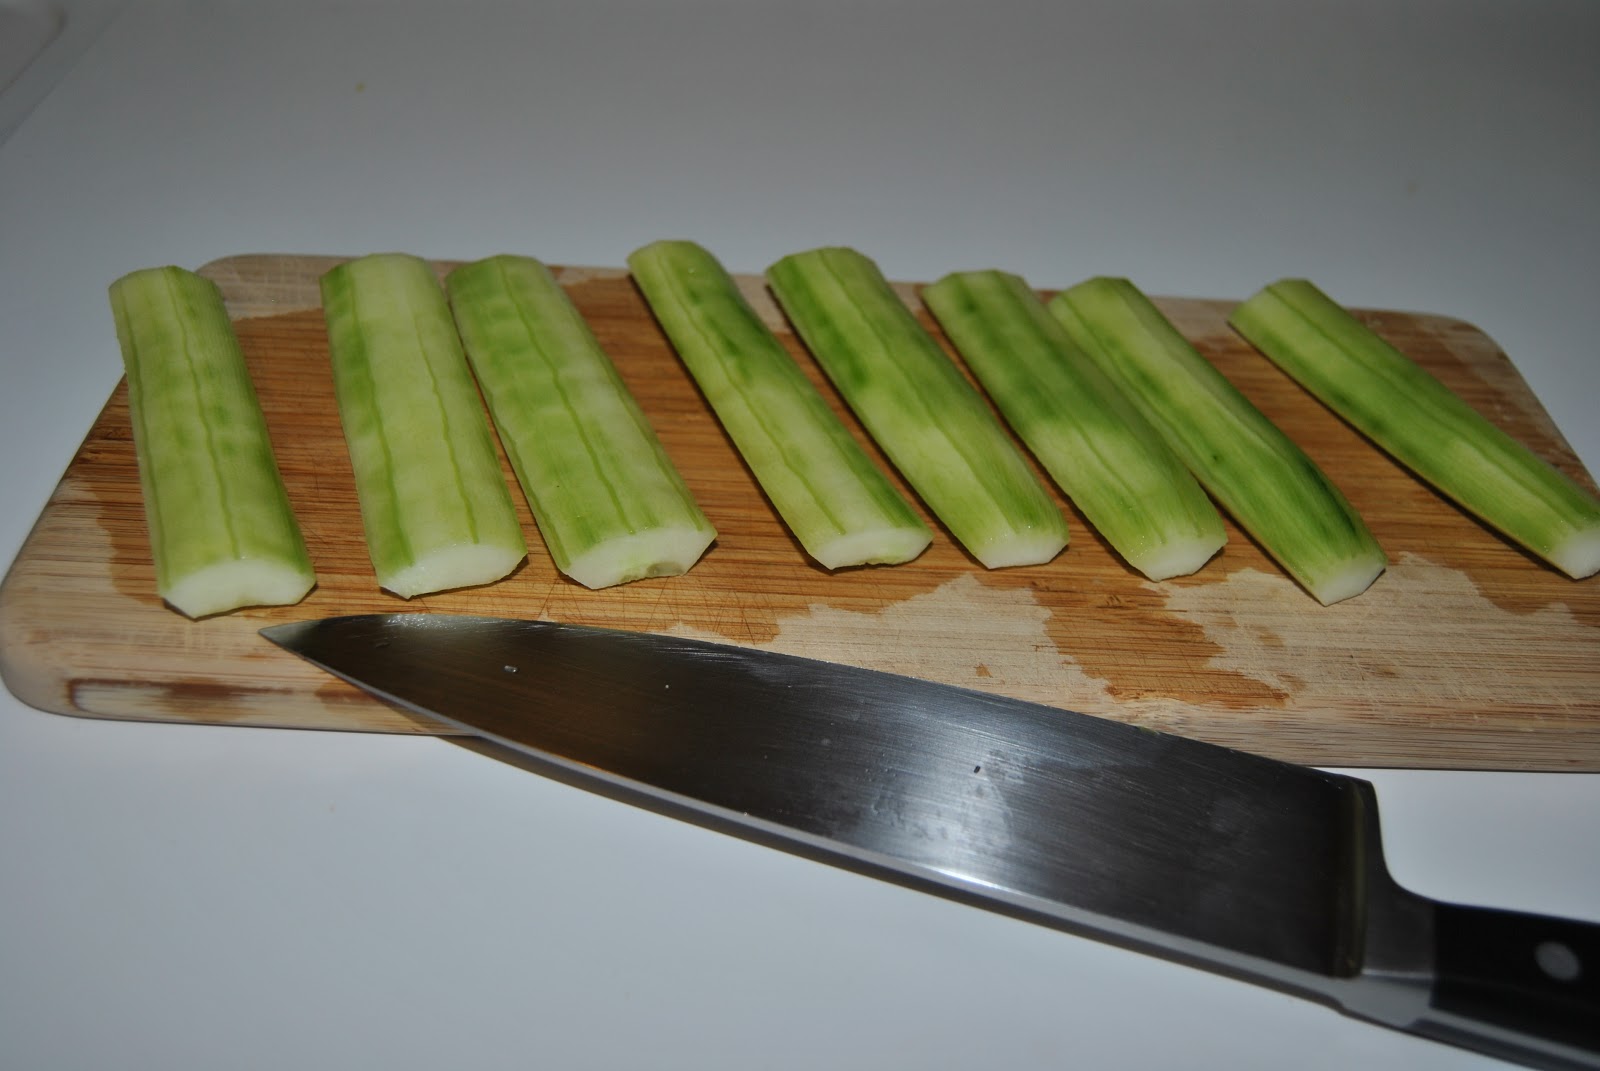
-Make a diagonal cut and remove strip of seeds.

-Cut into desired shape.
Wednesday, November 14, 2012
A Mid-Week Roast: Apple-Stuffed Pork Loin
I am a big fan of roasting meat because it doesn’t take
much prep work and it frees you up to make other things, or not make anything.
I can throw a piece of meat in the oven and then walk away. When roasting a
non-bird meat, it is really easy to gauge doneness because there is no guess
work when it comes to inserting a thermometer in the middle. It’s hard to mess
up that one. The next recipe I want to share is for Apple-Stuffed Pork Loin.


Pork, to me, can be pretty boring. It is often overcooked
and as a result dry. A lot of people also do not properly season their meat,
meaning they do not apply the right amount of salt and pepper. When I was in
school, our chef instructors’ biggest criticisms used to be that our dishes
needed more seasoning. A good marinade or spice and/or herb rub can be really
helpful when it comes to seasoning your meat but be sure to taste them first. On
the salt side of seasoning, sodium intake should be considered for health
reasons but if you are not on a special diet, you should make it your goal to
season your food adequately. You will be amazed at how the flavor will be
enhanced in your food. Even sweet concoctions tend to have at least a pinch of
salt to help bring out the flavor. If you are on a low-sodium diet, there are
some really tasty marinades and rubs that will keep sodium in check. If you
need to scale back on the sodium, just be sure to overcompensate with other
flavors so you don’t have boring meat.
I think I covered lackluster pork in the flavor department,
now on to the issue of dryness. Growing up I always learned that pork had to be
cooked to well-well done because of the fear of Trichinosis. I don’t know much
about what happens to you when you get Trichinosis
but I do know that if you cook your pork to 138 degrees, you won’t get it. When
I worked for Food Arts, I used to
attend a lot of food and wine events in New York City. I ate a lot of good food
and I don’t think I ever had overcooked pork. In fact, I think it tended to be
more on the medium-rare side in many cases. I don’t really enjoy it when it’s
medium rare but I do like a little pink in the middle and it’s perfectly safe
that way. For that reason, I typically cook stuffed pork loins and tenderloins
until the middle is 140-145 degrees and whole loins and tenderloins until 150-155
degrees. Just be sure that your thermometer is accurate. (Technique: Place your thermometer in ice water for 5 minutes. It
should read 32 degrees.) The temperature will also raise a few degrees while
the meat is resting. Resting=important. I can’t stress that enough. DO NOT cut
into your meat until it has been sitting at least 10 minutes out of the oven or
the juice will escape the meat and it will be dry. The juices need to recede
back into the meat once it has stopped cooking.
You can stuff your pork loin or tenderloin with anything.
I usually use whatever vegetables I have on hand and in this case, I used
apples since I have so many left over from a recent apple-picking excursion.
The apples and sage give the dish a nice impression of fall and make the pork very tasty. There are a couple of ways to flatten out a pork loin so you can stuff it but I
used the “butterfly” technique, which is explained below, since it was a
smaller loin. I chose to cook it by coating the loin with all-purpose flour and
sautéing it in butter, before finishing it off in the oven. The butter and flour give it a wonderful, yet light, golden-brown crust. If you want a simple pan sauce when you’re done,
remove the loin from the pan and place the pan on a medium-high burner. Pour about
a half cup of white wine, like a Pinot Grigio or Sauvignon Blanc, into the pan,
scraping up the brown bits (called suc-pronounced “suke”), and cook for a few
minutes. Strain the liquid, skim off any fat at the top, season if necessary
and drizzle over the sliced meat. Enjoy!

Apple-Stuffed Pork Loin
Serves 4
Ingredients:
1.5 lb. pork loin
Salt
Pepper
Cinnamon
1 tablespoon
chopped sage
½ shallot, sliced
½ large or ¾ small
apple, sliced
1 tablespoon
all-purpose flour
1 tablespoon
butter

Equipment:
Cutting board
Boning knife
Waxed paper
Meat pounder
3-12” pieces of
cooking twine
Large sauté pan
Meat thermometer
Procedure:
-Preheat oven to 400 degrees.


-Place meat on a cutting board and butterfly the loin. (Technique: Envision an imaginary line along
the longest side of the loin. Place your non-dominant hand on top of the meat
and with the other hand, take a boning knife(or paring knife if you don’t have
one) and cut along that imaginary line, from one end to the other, leaving one
side intact. (Repeat the cutting motion as many times as necessary.) It will look just like a hot dog bun sitting
on its side. Open up the meat like you would open a book.) Place waxed
paper on the meat and pound it so it flattens out. If the meat starts to tear,
stop pounding that section and move on to the next so the meat is evenly
flattened.


-Sprinkle 3 generous pinches each of salt and cinnamon and
2 generous pinches of pepper all over one side of the meat. Cover with sage, shallots
and apples and starting at one long end, tightly roll the meat, keeping the
shallots and apples inside.


-With the 3 pieces of cooking twine, tie up the loin
on both ends and in the middle. (Technique:
When tying the knot, loop it twice before pulling the ends for a tighter knot.
Repeat.)

-Sprinkle 3 pinches of salt and 2 of pepper all over the
outside of the meat (Technique: When
sprinkling, keep your hand high so the salt and pepper disperse evenly and over
a wide range.). Coat with flour and set aside.


-Heat the butter in a large sauté pan over
medium/medium-high heat. Cook loin on all sides for 3-4 minutes per side, or
until golden-brown on each side. Once the loin is turned to the final side for
browning, place the pan in the oven and cook until a thermometer in the center
reads 140-145 degrees, 25-30 minutes.


- Rest for 10 minutes, slice and serve.
Thursday, November 8, 2012
Cooking for 1 Plus 3: Risotto with Mushrooms
I posted a recipe for Steamed Mussels recently after
preparing a meal that I cooked for myself and my 3 children, but not my
husband, who had to work late. The meal consisted of mussels atop whole wheat
pasta, along with the broth, crusty bread, a glass of Pinot Grigio and there I
had it: an adult meal. Unfortunately, that meal didn’t quite cut it for my kids
so I fed them plain pasta with parm, crusty bread, 1 mussel each (a “try it
bite”) and sliced red peppers. Their glasses had milk instead of wine. I call
this method of cooking for myself and breaking apart the elements for my
children deconstruction. I find that
a lot of people who are cooking for themselves don’t always enjoy cooking
because they feel as though whatever they make yields too much and they do not
want leftovers for 4 nights in a row. And if you are feeding yourself and your
kids, you don’t necessarily want to base your meal on what they will eat,
because let’s face it, most kids are picky. And there it was, the birth of “Cooking
for 1 Plus 3”.
It’s actually not too difficult to prepare something satisfying for yourself, so you don’t eat your way to a craving, while giving your kid(s) a wholesome meal, more to their liking, too. I am not a short-order cook and rarely prepare two separate meals. My kids eat what I eat which is why I often, not always, but often deconstruct my meals for them. It was actually a huge breakthrough when they collaboratively decided that they liked lasagna. It’s like they could read each other’s minds and made a pact that they would now eat it.
Today’s dish is Risotto with Mushrooms. I definitely don’t expect my kids to eat mushrooms since I, myself, didn’t eat mushrooms as a child. I ate almost anything but not mushrooms until I was around 20. Now I love them. What changed my mind? I think it was good ole college peer pressure. Sometimes it is actually beneficial!
There are one or two things to know when you are cooking mushrooms. When I was in culinary school, the chef instructors, in their French accents, would always say, “Let it cook,” when we had onions, mushrooms or meat in a pan and the goal was to achieve a golden sear. What they meant by that was when you have your meat or onions or mushrooms in a pan, let them sit for 3-5 minutes to get the browning process started before you move the food around. You’re essentially caramelizing the surface and sealing in the juices. When you try to move meat that is not seared, it sticks. When you try to move mushrooms and onions when they’re not ready, they release their juices and steam. For mushrooms and onions, it is okay sometimes, but not every time.
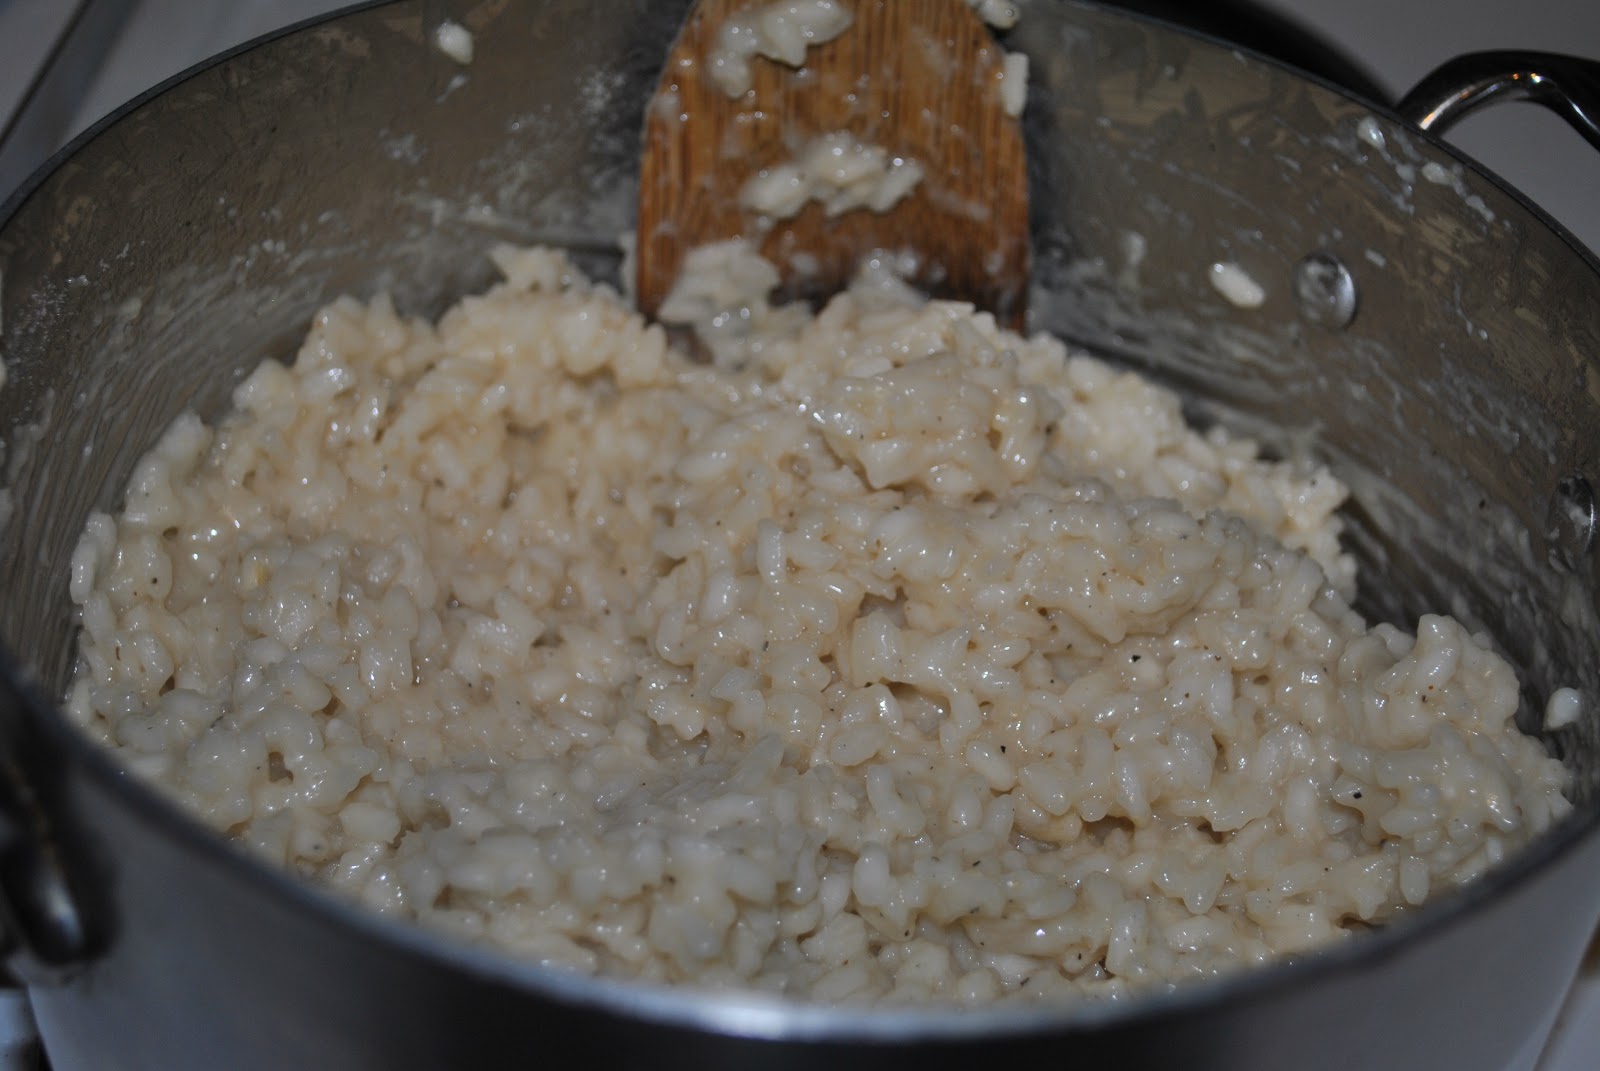
Risotto is relatively easy to cook. I typically start by sweating onions and garlic (“sweating” means that you move them around a lot so they do not color) and then I add the rice and cook it for about a minute. Next I add white wine, such as Pinot Grigio or Sauvignon Blanc, let that absorb, and add stock, a half a cup at a time, absorbing between each addition and stirring a lot, until the rice is al dente. Then you have risotto. Sometimes I add cheese but rarely heavy cream because it is creamy enough when it’s right. For my kids, there is no shot of getting them to eat it if they see onions and garlic floating around. If I have any chance of passing it off as “cheesy rice”, which is what I call it, I have to leave that stuff out. That’s okay because while the rice is cooking, I get a pan going off to the side with my add-ins.
When I was in culinary school, I had an internship at a restaurant that was called RM (it’s gone now). One thing I learned from the cooks was that risotto can be partially cooked, refrigerated, and then finished off to order. What that means for me is it’s one of those things I can cook almost all of the way in the morning, or whenever, and then finish off right before dinner. So for this dish, I cooked the risotto most of the way through and when it was time to eat, I finished cooking it while I was sautéing the mushroom mixture, which I had already prepped earlier and had ready to go. It took about 10 minutes for me to get everything ready for dinner which was great since we got home late from my daughter’s extra-curricular class. For this recipe, I did enough risotto for one adult and three children and a generous amount of mushroom mixture for 1 person. If you want it to be vegetarian, use vegetable stock. For vegan, go a second step after switching the stock and omit the cheese. Otherwise, enjoy!


Procedure:
Risotto:


 -Heat a medium saucepan over medium heat. Add olive oil
and then rice. Cook for 1 minute, stirring frequently. Pour in wine and stir frequently
until it absorbs. Add chicken broth, ½ a cup at a time, stirring frequently,
and adding more after each addition absorbs. The risotto is done once the rice
is al dente. At that point, stir in salt, pepper and cheese. Check for
seasoning (salt and pepper) and adjust if necessary.
-Heat a medium saucepan over medium heat. Add olive oil
and then rice. Cook for 1 minute, stirring frequently. Pour in wine and stir frequently
until it absorbs. Add chicken broth, ½ a cup at a time, stirring frequently,
and adding more after each addition absorbs. The risotto is done once the rice
is al dente. At that point, stir in salt, pepper and cheese. Check for
seasoning (salt and pepper) and adjust if necessary.
Mushroom Mixture:


 -While the rice is cooking, heat large sauté pan over medium
heat. Add oil and then mushrooms and onions. Spread them out in the pan and
then let them sit for 3-5 minutes, or until they begin to brown. Give the
mixture a light stir and then cook some more, moving things around occasionally.
When the mushrooms shrink and the onions are limp, add garlic and cook a minute
or two more. Add the salt, pepper, herbs and wine and stir to combine, cooking
until the wine is absorbed. Check seasoning and season with salt and pepper to taste.
-While the rice is cooking, heat large sauté pan over medium
heat. Add oil and then mushrooms and onions. Spread them out in the pan and
then let them sit for 3-5 minutes, or until they begin to brown. Give the
mixture a light stir and then cook some more, moving things around occasionally.
When the mushrooms shrink and the onions are limp, add garlic and cook a minute
or two more. Add the salt, pepper, herbs and wine and stir to combine, cooking
until the wine is absorbed. Check seasoning and season with salt and pepper to taste.
To Assemble:
-Scoop around 2/3 of the risotto into a bowl. Top with
the mushroom mixture and garnish with a sprinkle of fresh parmesan cheese.
It’s actually not too difficult to prepare something satisfying for yourself, so you don’t eat your way to a craving, while giving your kid(s) a wholesome meal, more to their liking, too. I am not a short-order cook and rarely prepare two separate meals. My kids eat what I eat which is why I often, not always, but often deconstruct my meals for them. It was actually a huge breakthrough when they collaboratively decided that they liked lasagna. It’s like they could read each other’s minds and made a pact that they would now eat it.
Today’s dish is Risotto with Mushrooms. I definitely don’t expect my kids to eat mushrooms since I, myself, didn’t eat mushrooms as a child. I ate almost anything but not mushrooms until I was around 20. Now I love them. What changed my mind? I think it was good ole college peer pressure. Sometimes it is actually beneficial!
There are one or two things to know when you are cooking mushrooms. When I was in culinary school, the chef instructors, in their French accents, would always say, “Let it cook,” when we had onions, mushrooms or meat in a pan and the goal was to achieve a golden sear. What they meant by that was when you have your meat or onions or mushrooms in a pan, let them sit for 3-5 minutes to get the browning process started before you move the food around. You’re essentially caramelizing the surface and sealing in the juices. When you try to move meat that is not seared, it sticks. When you try to move mushrooms and onions when they’re not ready, they release their juices and steam. For mushrooms and onions, it is okay sometimes, but not every time.
Risotto is relatively easy to cook. I typically start by sweating onions and garlic (“sweating” means that you move them around a lot so they do not color) and then I add the rice and cook it for about a minute. Next I add white wine, such as Pinot Grigio or Sauvignon Blanc, let that absorb, and add stock, a half a cup at a time, absorbing between each addition and stirring a lot, until the rice is al dente. Then you have risotto. Sometimes I add cheese but rarely heavy cream because it is creamy enough when it’s right. For my kids, there is no shot of getting them to eat it if they see onions and garlic floating around. If I have any chance of passing it off as “cheesy rice”, which is what I call it, I have to leave that stuff out. That’s okay because while the rice is cooking, I get a pan going off to the side with my add-ins.
When I was in culinary school, I had an internship at a restaurant that was called RM (it’s gone now). One thing I learned from the cooks was that risotto can be partially cooked, refrigerated, and then finished off to order. What that means for me is it’s one of those things I can cook almost all of the way in the morning, or whenever, and then finish off right before dinner. So for this dish, I cooked the risotto most of the way through and when it was time to eat, I finished cooking it while I was sautéing the mushroom mixture, which I had already prepped earlier and had ready to go. It took about 10 minutes for me to get everything ready for dinner which was great since we got home late from my daughter’s extra-curricular class. For this recipe, I did enough risotto for one adult and three children and a generous amount of mushroom mixture for 1 person. If you want it to be vegetarian, use vegetable stock. For vegan, go a second step after switching the stock and omit the cheese. Otherwise, enjoy!

Risotto with Mushrooms
Serves 1 adult, 3 children
*Gluten
Free*Vegetarian/Vegan Options*
Ingredients:
Risotto:
2 tablespoons
olive oil
1 ½ cups Arborio
rice
½ cup white wine,
such as Pinot Grigio
Around 3 cups low-sodium,
gluten-free chicken stock or broth
¼ cup parmesan or
Parmigiano-Reggiano cheese, plus more for garnish
½ teaspoon salt
¼ teaspoon pepper
Salt and pepper to
taste
Mushroom Misture:
3 tablespoons
extra-virgin olive oil
¼ pound or 4
ounces shitake mushrooms, sliced (see below)
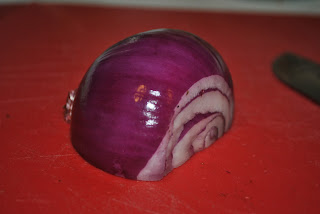
¼ medium red onion,
sliced (see below)
1 small clove
garlic, chopped
1/8 teaspoon salt
1/8 teaspoon
pepper
1 teaspoon chopped
herbs (such as half thyme, half sage)
¼ cup white wine
Salt and pepper to
taste


Equipment:
Medium saucepan
Measuring utensils
Wooden or bamboo
spoon
Chef’s knife
Cutting board
Procedure:
Risotto:


Mushroom Mixture:


To Assemble:
Sunday, November 4, 2012
Quick Cinnamon Scones
Yesterday morning was really cold for Virginia (30’s) considering
it was in the 80’s about a week ago. It was a good morning for a hot cup of
coffee, especially after I froze during my morning run. I needed a little
something extra so I sprinkled some cinnamon on my coffee. I figured it tasted
good, it smelled amazing and it might even soothe my sore muscles since it is
supposed to help with inflammation. (That’s one of those holistic things that
needs to be confirmed by more research but mentally, it made me feel better.) The
cinnamon tasted so good, I needed more so I decided to bake some cinnamon
scones. On a cold morning, nothing is better than the smell of fresh-baked
goods wafting through the air and scones are a great quick fix if you desire
something warm and delicious to pull out of the oven. But the best part for me is they always
make me think of my chaotic days back in the pastry kitchen.
My last tip for success: try to eat your scones warm, sitting down and with a good, hot beverage. Enjoy!


Procedure:
1. Preheat oven to 425 degrees. Line baking sheet with silicone mat or parchment paper.


 2. Cut butter into 32 small pieces (see photos). Place in
refrigerator until ready to use.
2. Cut butter into 32 small pieces (see photos). Place in
refrigerator until ready to use.
3. Combine dry ingredients (2 cups flour, ¼ cup sugar, baking powder, baking soda, salt and cinnamon) in a large bowl.

 4. Hand Method: Whisk
dry ingredients to combine. Add butter and blend either with two knives,
cutting with a scissor motion, or a pastry cutter. Cut until butter is the size
of peas and the mixture resembles textured sand. Continue to Step 5.
4. Hand Method: Whisk
dry ingredients to combine. Add butter and blend either with two knives,
cutting with a scissor motion, or a pastry cutter. Cut until butter is the size
of peas and the mixture resembles textured sand. Continue to Step 5.
Food Processor Method: Place dry ingredients in food processor and blend for 10 seconds or so to aerate. Add butter and pulse 5-7 times until butter is the size of small peas and the mixture resembles textured sand. Place in large bowl. Continue to Step 5.
 5. Add buttermilk and toss with a fork until a dough
begins to form. Lightly flour the counter and place the dough on the counter, kneading
a few times until a cohesive dough forms.
(Technique: to knead, fold dough in half,
make a quarter turn clockwise, fold in half again, turn a quarter of the way
again. Repeat only if needed.) Do not over knead!
5. Add buttermilk and toss with a fork until a dough
begins to form. Lightly flour the counter and place the dough on the counter, kneading
a few times until a cohesive dough forms.
(Technique: to knead, fold dough in half,
make a quarter turn clockwise, fold in half again, turn a quarter of the way
again. Repeat only if needed.) Do not over knead!

 6. Shape into a circle, with your hands, that is 1 inch
high. With a bench scraper or long knife, cut into 8 wedges. (Technique: Coat bench scraper or knife with
flour between every cut to ensure proper rising.)
6. Shape into a circle, with your hands, that is 1 inch
high. With a bench scraper or long knife, cut into 8 wedges. (Technique: Coat bench scraper or knife with
flour between every cut to ensure proper rising.)

 7. Place wedges on baking
sheet and brush with heavy cream and sprinkle with remaining sugar. Bake for
approximately 12 minutes, or until scones just begin to brown. Cool 10 minutes
and enjoy!
7. Place wedges on baking
sheet and brush with heavy cream and sprinkle with remaining sugar. Bake for
approximately 12 minutes, or until scones just begin to brown. Cool 10 minutes
and enjoy!

When I worked at Mesa Grill, I was on the morning-brunch shift
for much of the time. We made everything from A to Z. Biscuits, scones, coffee
cake, muffins, rolls-you name it. The thing about NY restaurants is there is no
room for error. Everything had to be perfect every time so when you worked in
one of those restaurants, you learned quickly to hone in on your skills. There
was no mercy when you made a mistake. It was known throughout the pastry
kitchen-we were warned early on- that if you made a mistake, you had to throw
it in the trash immediately. Bobby did not come back to our hole-in-the-wall
space often but when he did, he would bust you immediately if you slipped up.
We called it Flay-dar. There was one story-confirmed and not urban legend-of
when he was out for a run on a Saturday morning. He never came in the
restaurants on Saturday mornings but on that particular morning he decided to
detour through his kitchens. He wandered into the pastry kitchen and pulled a
scone from the cooling rack. There were at least a dozen trays of varied-baked
goods cooling but he managed to pull a scone from the one tray that had been
overcooked. The chef had set them there to cool before throwing them away but
he or she also happened to set them on the cooling rack that the wait staff
would go to for items to fill bread baskets. He was p-o’d big time. From that
point on, everyone knew that if you ever made a mistake, trash the evidence immediately
before Chef Bobby could catch you because he always did. If that wasn’t a way
to instill fear of screwing up, I don’t know what was. If you made enough
mistakes, there was a line of chefs who were waiting to take your place and
work for meager pay.
Thankfully, out of fear, eagerness to learn, or simply
having a perfectionist personality, I learned a lot of baking tricks. Scones seem
simple but there are quite a few things to keep in mind when making them.
First, everything should be cold. If you want rise, you need to surprise those
butter bits in the oven so they cook up and not sideways. Second, you do not
want to overwork the dough. Only combine it until it just comes together. It
needs to be homogenous, but not worked into submission or the scones will be
tough and won’t rise well. You should work quickly and get them into a hot oven
as soon as you are done sprinkling sugar on the dough. I can make them in 30 minutes, start to finish, including clean up. Practice makes a difference! When cutting the scones,
coat your bench scraper (see photo below) or knife with flour between every
cut. If you don’t, the dough will seal on the sides and, again, not rise
properly. I also don’t sprinkle sugar on them if I need to wrap them up because
it gives them a weird coating once unwrapped.
Some recipes use eggs either in the dough or brushed on
the dough, but I do not because I don’t like a lot of color on my scones. Eggs
facilitate browning. If you want mini scones, shape the dough into a square,
cut it in half and then cut triangles from there. You should result in twice as
many scones. If you would like to make a different flavor, you can omit the
cinnamon, add some lemon or orange zest (about a tablespoon), dried fruit like
raisins, cranberries or blueberries (about a half a cup). If you do fresh berries,
freeze them first. Add the berries or dried fruit with the buttermilk.
You can make this recipe by hand or with a food processor. Both techniques are below. It takes a little longer by hand but you will be less likely to overwork the dough. I often cheat and use a food processor when I am pressed for time so don't feel bad if you go with that method.
My last tip for success: try to eat your scones warm, sitting down and with a good, hot beverage. Enjoy!

Flaky Cinnamon Scones
Makes 8
Ingredients:
1 stick (4 ounces) unsalted butter, cold
2 cups all-purpose flour, plus more for counter
¼ cup organic sugar, plus 1 tablespoon for sprinkling
2 teaspoons baking powder
½ teaspoon baking soda
¼ teaspoon kosher salt
2 teaspoons strong cinnamon
¾ cup buttermilk
1 tablespoon heavy cream


Equipment:
Large baking sheet
Silicone mat to fit baking sheet OR parchment paper
Large bowl
Food processor
(If using the hand method, you need either 2 dinner
knives or a pastry cutter)
Fork
Large knife or bench scraper (see photo above)
Pastry brush
1. Preheat oven to 425 degrees. Line baking sheet with silicone mat or parchment paper.


3. Combine dry ingredients (2 cups flour, ¼ cup sugar, baking powder, baking soda, salt and cinnamon) in a large bowl.


Food Processor Method: Place dry ingredients in food processor and blend for 10 seconds or so to aerate. Add butter and pulse 5-7 times until butter is the size of small peas and the mixture resembles textured sand. Place in large bowl. Continue to Step 5.


Subscribe to:
Posts (Atom)